
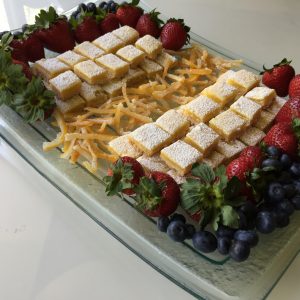
Lemon Bars

Time: approximately 50-60 minutes to prepare and bake, plus a few hours to cool and 10 minutes to cut
Serves: makes 40 bars that are about 1.5 x 1.5 inches
Inspired by: I love lemon much more than chocolate and have always enjoyed any type of lemon dessert – cupcakes, cakes, candied lemon rind… I don’t remember when I first made these or where I found the recipe, but they are so easy, and always come out just right. They are a nice balance to all the other flavors I often make for desserts at parties.
Ingredients:
CRUST
- Cooking spray
- 2 cups all-purpose flour
- 1/2 cup confectioners’ sugar (plus a little extra for dusting at the end)
- 8 tablespoons (1 stick) unsalted butter, melted
FILLING
- 1 cup granulated sugar
- 1/4 cup all-purpose flour
- 1 teaspoon baking powder
- Pinch of salt
- 4 large eggs, slightly beaten
- 1 teaspoon grated lemon peel
- 1/2 cup fresh lemon juice
Preparation:
- To make the crust – preheat your oven to 350 degrees. Line a 9 x 13″ glass baking dish with foil, extending the foil over the rim: spray foil with cooking spray.
- In a large bowl, combine flour, confectioners’ sugar, and butter with fingertips until well blended. Press mixture firmly (pack it down) into bottom of prepared pan. Bake until lightly brown, 20-25 minutes.
- To make the filling – in a medium to large bowl, whisk sugar, flour, baking powder and salt until blended. Add eggs, lemon peel and lemon juice and whisk until blended.
- Pour filling over hot pie crust. Put it on a level shelf in the oven and bake until set – about 20 minutes. Transfer pan to wire rack and cool completely.
- Dust top lightly with confectioners’ sugar. To serve, use foil “handles” to lift crisp out of pan. Place on cutting board and cut into squares.
Notes: I’ve used granulated sugar instead of confectioners’ sugar in the crust when I only had enough confectioners’ sugar for the dusting at the end. It worked out just fine but the crust gets harder. I think the finer confectioners’ sugar is the better way to go. Once I used raspberry preserves instead of the lemon juice and lemon rind and those came out great too.
Fresh Pasta with Sautéed Mushrooms

Time: 10-15 minutes
Serves: As many as you’d like
Inspired by: Eating at Madison & Fifth with my good friend Jeanette. We LOVE the pasta/mushroom dish there – it’s much more decadent than what I make because it has truffle oil and butter – but that dish really just reminds me that I love fresh pasta with any kind of sautéed or grilled mushrooms on top! This is about the easiest dish to prepare – no recipe required really – but I’m posting this as a reminder to myself to make this now and then.
Ingredients:
- Fresh pasta – I prefer Pappardelle or any thin, wide fresh pasta noodle
- Approximately 3/4 of a cup chopped mushrooms per serving – I think all mushrooms rock – these are cremini in the photo but I’ve used all kinds and often many kinds all together (grilled Portabellas are another favorite)
- Butter or olive oil
- Fresh lemon juice
- Salt and pepper
- Fresh minced garlic (optional)
- Fresh parsley chopped (optional)
Preparation: Wash, slice and sauté mushrooms in butter or olive oil – add salt and pepper to taste. I think salt is the key to bringing out the flavors of the mushrooms. Mushrooms are also best when not overcooked – keep them firm and juicy – probably about 5-8 minutes on a medium heat for cremini’s – this varies quite a bit per type of mushroom. If you love garlic, add some minced garlic a few minutes before the mushrooms are finished cooking. When the mushrooms are just about finished, take them off the heat. Cook the pasta according to instructions, usually about 2 minutes. Drain pasta and immediately toss in olive oil, a bit of lemon juice and a bit of salt and pepper. Add some chopped parsley if you like. Pour the mushrooms and their cooking juices over the top and toss lightly.
Notes: I recently made my favorite grilled vegetable lasagna and had a couple of packages of fresh lasagna sheets left over so I cut them into 3/4″ strips and they were awesome as pasta noodles. The fresher the pasta, the more easily the noodles stick to each other so add some olive oil to your cooking water, stir pasta immediately after dropping into the water, and add some salt for flavor. Continue stiring a bit to keep the noodles separated while cooking. After draining, toss immediately with olive oil to keep noodles separated.
Wine Suggestions: I love an earthy Red Burgundy with anything mushroom! My next choice would be a high-acid white to cut through the butter such as a Chablis or White Burgundy. Because this is buttery, many people would also love a rich, buttery and creamy California Chardonnay.
Easy Tiramisu

Time: Approximately 40 minutes from start to finish, and it should rest in the refrigerator at least a few hours before serving. It can also be made up to several days before serving. But good luck not getting into it if you try that!
Serves: 20-30
Inspired by: When I lived in Hong Kong, I discovered that it is a mecca for fabulous food of most ethnicities. After an incredible Italian meal and the best Tiramisu I’d ever had in my first month there, I found myself on a quest to find the perfect Tiramisu. It was fun seeing how many different styles and flavors there were! I must have had more than 20 different versions during my year there. After a few more yummy Tiramisu desserts in Italy over the past few years and surprisingly, my favorite little town in Mexico, Sayulita, I decided it was time to learn to make it. I hosted an Italian wine tasting recently and finally gave it a try. Yum! This recipe is a mix of various versions I found on the web. This one does not use any raw eggs.
Supplies:
- 9-inch-by-13-inch-by 2 inch dish or 15-inch-by-10-inch-by 2 inch dish (for Tiramisu)
- 5 x 9 x 2 in dish (optional – for a second Tiramisu if you have remaining ingredients)
- Small flat dish for dunking ladyfingers in coffee/liquor mixture
- Mixing bowl
- Mixer
- Very fine cheese grater (for the chocolate topping)
Ingredients:
- 16 oz mascarpone cheese
- 3 cups heavy cream (1.5 pints)
- 2 tablespoon confectioners’ sugar
- 1 ½ Cointreau (or dark rum or the liquor of your choice)
- 1 ½ cups espresso or strong French pressed coffee
- 1 tablespoon vanilla extract
- 60 lady fingers cookies
- 4 oz dark chocolate (sweet, not the kind for baking) for grating over the top
Preparation:
- Make espresso or strong coffee.
- Mix espresso with the liquor in equal parts. It is easiest if you put this into a small flat dish so it’s easy to dip one side of the lady fingers cookies quickly and evenly, but any bowl can work.
- In a large mixing bowl combine mascarpone cheese, heavy cream, confectioners’ sugar, 4 tablespoons of the coffee/liquor mixture, and 1 tablespoon vanilla.
- Beat until creamy and smooth and can hold a shape (but not so thick where it becomes butter) – approximately 3-4 minutes.
- Quickly dip one flat side of lady fingers in the coffee/liquor mixture and layer them on the bottom of your pan (approximately 20-23 cookies for the 9-inch-by-13-inch dish) – they do not all have to lay the same direction or look pretty – just fully cover the bottom of the pan.
- IMPOTANT NOTE: if you like your tiramisu stronger (more coffee/liquor flavors) – dip both sides of cookies wet with your coffee/liquor mixture, but I prefer just dipping one side in quickly. I just made this tonight in celebration of my good friend Jeanette – I thought it would be a fun alternative to a birthday cake after our Italian-themed dinner. I thought it turned out too strong – much more so than the last time I made it – and I’m sure it’s because I dunked the cookies rather than dipped one side quickly. Next time I’ll be sure the cookies stay crispy and just one side is dipped in very quickly.
- Spoon the cream mixture over the lady fingers and spread as if you were icing a cake – about ¼ inch thick (don’t use more than half of your mixture, but you’ll more likely use about a quarter or a third of it).
- Then dip and layer the rest of the ladyfingers on top of the cream.
- Top off with additional cream mixture and fully cover the top so it is smooth – again, about ¼ inch thick.
- At this point, depending on what size pan you started with and how thick you layered the cream, you should have just enough ingredients left to make one more small Tiramisu in a 5.5 x 9 x 2 inch glass baking dish.
- With a very fine grater, grate the chocolate over the top.
- Let rest in refrigerator for a few hours before cutting – lasts for about one week in the refrigerator.
Wine Suggestions: I’m not a huge fan of wine with Tiramisu. I prefer it with an espresso (and in my case a decaf espresso or I’d be doing gymnastics all night!).

Coconut Rice
Time: 5-10 minutes of prep time and 70 minutes of cook time
Serves: 8
Inspired by: My love for Asian flavors. There is a restaurant in Truckee called Dragonfly that I love going to when I’m up in Tahoe to ski. They prepare fabulous Asian-flavored dishes. I had a meal there once that was served with coconut rice and remember coming home to try to replicate the entire dish. It was no where near what I had at Dragonfly because they also also prepare beautiful sauces on their fish that perfectly compliment the rice (or vice versa), but at least my coconut rice turned out well!
Ingredients:
- 2 cups uncooked rice (Basmati rice is the most flavorful and aromatic)
- 2 cups coconut milk (or do 1 full can of coconut milk and make up the balance with water)
- 1 cup water
- 2-4 tablespoons sugar (depends on how sweet you like this)
- 1-2 teaspoons freshly minced ginger (optional – if you like ginger this adds a beautiful flavor)
Preparation: In a 5 x 9 x 2 ½ inch glass baking dish, combine all ingredients; mix well. Seal pan snuggly with aluminum foil. Bake at 350 degrees for 70 minutes. However, you can count on the rice staying hot in the dish covered with foil for about 45 minutes and warm for about 2 hours if you are trying to prepare it in advance for a party.
Notes: I like this rice with a seared Ahi salad because Michelle’s 18 spice and Spice it Up …by Karen™ combined with the papaya are great flavor combinations with the coconut.
Wine Suggestions: The sweetness of this dish will best go best an off-dry or sweet wine such as a Kabinett level German Riesling or similar.
Armenian Rice Pilaf – Baked

Time: 45-55 minutes
Serves: 8-10
Inspired by: My passion for throwing parties and not spending a lot of time cooking during them. I love the Armenian rice pilaf that I grew up with, but I feel like I have to tend to it while it’s cooking. I wanted to figure out how to make larger quantities, do most of the preparation ahead of time, and then put it in the oven to come out just at the right time for a large dinner party. After several experiments and refinements, this is recipe that I now use often.
Ingredients:
- 1 ½ cups uncooked Basmati or long grain white rice (I prefer Basmati as it’s more flavorful and aromatic)
- ¾ cup vermicelli noodles broken into 1 inch pieces
- 3 cups chicken broth
- ¾ teaspoon salt
- 1 ½ tablespoons butter
Preparation:
- Melt butter in skillet over medium heat and lightly brown vermicelli noodles
- Combine with all other ingredients in a 5 x 9 x 2 ½ inch glass baking dish and mix well
- Seal pan snuggly with aluminum foil
- Bake at 400 degrees for 35-40 minutes, or at 350 for 40-45 min
- When you remove it from oven, it may still look fairly “wet” and the rice may not be completely finished cooking
- If needed, let it sit out of the oven, covered, for about 10 minutes and serve
- Add some really hot chicken broth or water just before serving to make it juicier
Notes: I love this for parties. For advanced preparation, I typically brown the vermicelli noodles and put them in the baking dish (and any excess butter) with the rice and salt and mix it well. I measure out the chicken broth and have it ready to mix in. This way, it only takes a minute to prepare it and put it in the oven when I’m ready.
This is great with any meal, but nice to incorporate into a Mediterranean-themed meal such as hummus or baba ganoush as a starter, and served with lemon-herb chicken kabobs and Greek salad.
Wine Suggestions: This is a fabulous enhancement to a meal if you are serving a high acid white wine or a red wine with some tannins because of the salt and butter. For those who enjoy a rich, buttery, California chardonnay – that could be a very complimentary pairing as well.
Armenian Rice Pilaf – Stove Top

Time: 30 minutes
Serves: 4 as side dish
Inspired by: My Armenian grandmother and my mom always made this when I was growing up. The family loved it. We still love it. I believe the only things that have changed in the recipe is that the amount of butter used has probably decreased a bit and I’ve begun using Basmati rice because it’s more flavorful and aromatic than the long grain white rice I grew up with.
Ingredients:
- 1-2 tablespoons butter
- 1 cup vermicelli noodles broken into 1 inch pieces
- ¾ cup uncooked Basmati rice
- 1 small can organic chicken broth (get regular – not the low salt stuff)
- ¼-1/2 teaspoon salt (optional – depends how salty you like it)
Preparation:
- Melt butter in skillet over medium heat and lightly brown vermicelli noodles (about 5 minutes).
- Combine with all other ingredients and bring to a boil.
- Then remove from heat or keep on a very low simmer for about 20 minutes or until moisture is absorbed and rice is consistency you like.
- Just before serving, you can add just a bit of very hot water or additional chicken broth to make it juicier.
Notes: For making larger quantities and for easier prep for parties, check out my baked rice pilaf recipe. This is great with any meal, but nice to incorporate into a Mediterranean-themed meal such as hummus or baba ganoush as a starter, and served with lemon-herb chicken kabobs and Greek salad.
Wine Suggestions: This is a fabulous enhancement to a meal if you are serving a high acid white wine or a red wine with some tannins because of the salt and butter. For those who enjoy a rich, buttery, California chardonnay – that could be a very complimentary pairing as well.