
Stuffed Mushrooms

Time: 1 hour
Serves: 45 “bites”
Inspired by: I can’t remember when I first had these. I just know that I’ve always loved mushrooms of any type, and every time I’ve had these I’ve thought they were decadent. With something close to these ingredients as the stuffing, I don’t know how you can go wrong. I love that they are easy to prepare ahead for parties and I think they still taste good even when they cool off and are only at room temperature.
Ingredients:
- 45 cremini mushrooms
- 1 onion, chopped well
- 2 cloves garlic, minced very fine
- 2-3 tablespoons butter
- 5 stalks celery, chopped well
- 1 cup chopped parsley
- 1 1/2 cups grated parmesan
- 1 teaspoon freshly ground black pepper
- salt to taste
- 1/2 – 1 cup bread crumbs
Preparation:
- Wash mushrooms; remove stems carefully to keep mushrooms whole – keep the stems
- Slice off a very small sliver on the rounded side of the mushroom and lay them on a cookie sheet (that keeps them from rolling around)
- Chop all the excess mushroom stems and pieces well
- Melt the butter in a large saute pan and saute the onions, chopped mushroom stems and garlic – about 10 minutes on medium heat
- Add the chopped celery, parsley and black pepper – saute another 10-20 minutes until everything is cooked through
- Add the parmesan and then begin adding some breadcrumbs until the mixture is your desired thickness for stuffing the mushrooms
- Stuff the mushrooms so that they are very full and rounded at the caps
- Bake at 350 degrees for about 20 minutes
Notes: You can prepare these and wrap them up well in the refrigerator a day ahead of cooking. It’s best to bring them to room temperature before baking. And a note to myself – I think chopping all this stuff should work just fine on “pulse” mode in the food processor. Every time I make them I think about that when I’m almost finished chopping. It would save a lot of time!

Stuffed Mushrooms – Pre Baked
Wine Suggestions: I love mushrooms with a Red Burgundy, but I think the flavors here would go well with most high-acid crisp whites (White Burgundy, Gruner Veltliner, Sancerre, Chenin Blanc), and light to medium-bodied reds (Red Burgundy/Pinot Noir, Rioja).
Chewy Cherry Brownies

Time: approximately 1 hour; 20-25 minutes prep; 30-35 minutes to bake
Serves: approximately 30 2 x 2 inch squares
Inspired by: My friend Jeanette makes the most amazing brownies. She never gives out her recipe – smart girl! I am making desserts for my New Years Eve party and wanted to try one new dessert. It’s funny to realize that I’ve never made brownies. As I thought about what I’d like in a brownie, chewy and cherries came to mind (I love both) so I decided to at least attempt something like that. If you are a brownie “purist” I’m sure you’ll want to skip the cherries. I took the core of an old recipe on the Sunset magazine website for chewy brownies and then added my own twists — dried tart cherries and orange zest. I have no idea if the orange zest did anything at all since the other flavors are so strong/rich, but it sounded good to me when I saw an orange here in my kitchen. I might even try adding a bit more next time. I can’t believe how easy they were to make, but the jury is still out…. I wasn’t crazy about how “gooey” they came out initially. For me, chewy = great. Gooey = ?? I’m not sure about that yet. I did find, however, that they were awesome with a perfect consistency two days after making them.
Ingredients:
- 1 cup unsalted butter, cut into chunks
- 4 ounces of unsweetened chocolate, broken into chunks (1/2 of an 8 oz Ghirardelli bar)
- 4 large eggs
- 2/3 cups sugar
- 3 tablespoons orange zest (or whatever you get by grating the peel of one orange)
- 2 teaspoons vanilla
- 1 cup all purpose flour
- 1/4 – 1/2 cup semi-sweet chocolate pieces (the other half of an 8 oz Ghirardelli bar broken into small pieces)
- 1/2 cup dried and pitted cherries (I used Montmorency cherries that I found at Trader Joes)
Preparation:
- In a small saucepan melt the butter and the unsweetened chocolate on medium to low heat. Begin stirring once it is soft and remove from heat once it is melted.
- In a large bowl, hand mix the eggs well.
- Add the sugar, vanilla and orange zest; mix well.
- Add the chocolate/butter mixture; mix well.
- Add the flour and mix well (you can easily do all the mixing by hand).
- Butter a 9 x 13 x 2 inch baking dish and pour the brownie mixture into the dish.
- Sprinkle the semi-sweet chocolate pieces and cherries over the top evenly and then push down and spread a bit so they are slightly covered with brownie mix.
- Bake in a 350 degree oven for 25 minutes.
- It should spring back a bit with a quick touch, but unlike a pie, an inserted knife will not come out clean – it should still be pretty gooey inside.
- Let cool completely on a rack before cutting. Will stay fresh for a couple of days (normally I’d say in an air tight container but I left mine in pastry cups in the open air and they were even better two days later).
Notes: I originally used 3/4 cup of the cherries and the semi-sweet chocolate chips and a bit more chocolate in the initial mix and I think it was too much of both, so I already modified the recipe a bit. I might even skip adding the chocolate chips at the end next time and see how they are without. I need a lot more experimentation here – but wanted to keep these notes for next time I try this again!
Wine Suggestions: I would skip the wine – these are so rich, but I’ll add a few notes here. I often hear people say they like red wine and chocolate. I can see how this might work in some unique cases of overripe, almost sweet wines, but I prefer my wine to be a bit sweeter than my dessert. I think a late harvest zinfandel or a tawny port could be awesome with chocolate, and fortified fruity wines like Banyules and Ruby Ports typically have cocoa or chocolate in the nose, as well as other berry fruits like cherry and raspberry and are classic companions to chocolate.
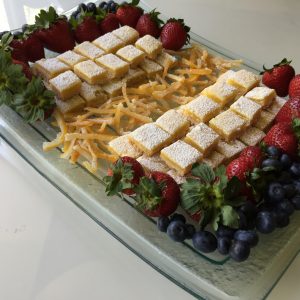
Lemon Bars

Time: approximately 50-60 minutes to prepare and bake, plus a few hours to cool and 10 minutes to cut
Serves: makes 40 bars that are about 1.5 x 1.5 inches
Inspired by: I love lemon much more than chocolate and have always enjoyed any type of lemon dessert – cupcakes, cakes, candied lemon rind… I don’t remember when I first made these or where I found the recipe, but they are so easy, and always come out just right. They are a nice balance to all the other flavors I often make for desserts at parties.
Ingredients:
CRUST
- Cooking spray
- 2 cups all-purpose flour
- 1/2 cup confectioners’ sugar (plus a little extra for dusting at the end)
- 8 tablespoons (1 stick) unsalted butter, melted
FILLING
- 1 cup granulated sugar
- 1/4 cup all-purpose flour
- 1 teaspoon baking powder
- Pinch of salt
- 4 large eggs, slightly beaten
- 1 teaspoon grated lemon peel
- 1/2 cup fresh lemon juice
Preparation:
- To make the crust – preheat your oven to 350 degrees. Line a 9 x 13″ glass baking dish with foil, extending the foil over the rim: spray foil with cooking spray.
- In a large bowl, combine flour, confectioners’ sugar, and butter with fingertips until well blended. Press mixture firmly (pack it down) into bottom of prepared pan. Bake until lightly brown, 20-25 minutes.
- To make the filling – in a medium to large bowl, whisk sugar, flour, baking powder and salt until blended. Add eggs, lemon peel and lemon juice and whisk until blended.
- Pour filling over hot pie crust. Put it on a level shelf in the oven and bake until set – about 20 minutes. Transfer pan to wire rack and cool completely.
- Dust top lightly with confectioners’ sugar. To serve, use foil “handles” to lift crisp out of pan. Place on cutting board and cut into squares.
Notes: I’ve used granulated sugar instead of confectioners’ sugar in the crust when I only had enough confectioners’ sugar for the dusting at the end. It worked out just fine but the crust gets harder. I think the finer confectioners’ sugar is the better way to go. Once I used raspberry preserves instead of the lemon juice and lemon rind and those came out great too.
Crab Cioppino

Time: 60-75 minutes
Serves: 4 – just the two of us had this tonight with fresh whole grain bread and roasted brussel sprouts. We could have easily had two more people join us – we ate way too much and we’ll still have awesome leftovers for tomorrow.
Inspired by: It’s the end of December and for the past couple of weeks, I’ve been seeing Dungeness crab at the fish counter. I’ve been thinking that I must get some of these before the season is over! I LOVE crab and it brings with it a lot of memories for me – mainly related to my dad. I remember as a child going out for crab with my family, and my brother and I would leave the restaurants still playing with the claws. I also think of my dad ordering crab cioppino at restaurants and wearing a bib because it was so messy. When I started thinking about what I wanted to have for dinner tonight, crab and tomatoes came to mind… and that got me googling crab cioppino recipes. The first one I found was “Judith’s Dungeness Crab Cioppino Recipe” from Food and Wine (Judith was chef Michael Mina’s late mother-in-law who apparently used to make it for Christmas Eve dinner). It looked great and easy, but I had to make a few modifications based on ingredient availability and the fact that I was cooking for 2, but it turned out so amazing, I’ll do it exactly the same way next time! This recipe makes a very thick soup with a LOT of kick! Yum.
Ingredients:
- 1/4 cup olive oil
- 1 small red bell pepper – chopped
- 1 small onion – chopped
- 1 large jalapeno – minced
- 4 medium garlic cloves (2 minced; 2 whole)
- 1 tablespoon tomato paste
- 1-2 bay leaves
- 1/2 cup dry red wine
- 1 14 oz can of fire roasted organic tomatoes – diced
- 1 10 oz can of whole baby clams
- 1 teaspoon freshly ground black pepper
- 1/2 teaspoon salt
- 1 1/2 cups hot water
- 1/2 – 1 cup packed basil leaves
- 1/2-1 teaspoon crushed red pepper
- 1 steamed Dungeness crab
- 8 mussels
- 8 littleneck clams
- 12 shrimp – shelled and deveined
- some small scallops or halibut pieces (optional)
Preparation:
- In a large soup pot, sauté the onion for about 2 minutes on high heat. Add the red bell pepper and sauté for about 2 more minutes. Add the minced garlic and jalapeno and sauté for another 6 minutes or until it is all very soft and beginning to brown.
- Add the tomato paste, stir well, and cook for another minute.
- Add the tomatoes, wine and bay leaf and cook for another 5-10 minutes – until thickened.
- Add the can of clams with their broth and season with salt and pepper.
- Bring to a boil and cook on medium heat for about 20 minutes.
- Meanwhile – in a food processor – combine the basil leaves, whole garlic cloves, and red pepper flakes – chop well. Add 1/8 cup of olive oil and puree until smooth. Then prepare the crab by removing the top shells and the flap on the undersides – pry out any brownish insides and feathery lungs and discard. Rinse the crab bodies in cold water and break them up into pieces that are a few inches in length – or however you’d like to see them presented in your dish when serving.
- Now it’s time to add the clams, mussels and shrimp to the pot – be sure to push them into the hot broth. Once the shells of the clams and the mussels open (about 2 minutes), add the crab pieces and push into the broth as much as possible – put the lid on the pot and continue to cook for another 2-4 minutes until everything is hot.
- Use tongs to take out all the shellfish and distribute evenly into bowls – then scoop out broth evenly into bowls.
- Drizzle/spread the basil puree over the top of each and serve with fresh bread.
Notes: I would have liked including some scallops, but they weren’t available. White fish, such as Halibut, would have been good too. If you like your broth thinner – replace the can of clams with 16 oz of clam broth (I wasn’t able to find it – the stores were probably sold out from Christmas, but it’s what the original recipe called for). I’m sure you could also double the diced tomatoes without losing flavor – this is a VERY flavorful and spicy dish! It can also be made ahead and refrigerated for up to 3 days.
Wine Suggestions: We drank this with a 2003 La Spinetta Barbera d’ Asti Superiore. It needed some decanting, but it was a fabulous pairing with the rich tomato and spice of the dish.
White Bean Pesto Dip

Time: 10-15 minutes
Serves: 8-12 as an appetizer
Inspired by: One of women in my book club, Nancy Beth Garrett, made something very similar to this recently with a pesto sauce from Trader Joes. I couldn’t stop eating it and stuffed myself before dinner!
Ingredients
- 2, 14 oz cans cannellini beans (white kidney beans), drained
- Juice from about ½ a lemon
- 1 garlic clove – crushed
- ½ cup olive oil
- 1 bunch basil
- 2-4 tablespoons freshly grated parmesan cheese
- ½ teaspoon salt
Preparation:
Pesto – Wash and dry basil leaves; put into food processor and chop a bit first. Add olive oil, crushed garlic, grated fresh Parmesan and salt. Chop/blend well. Pour the pesto into a bowl or jar to store (you will only use some of it).
Dip – Without cleaning the food processor, add the beans and 1-2 teaspoons of lemon juice and pulse chop to your desired consistency OR instead, you can just hand mash this in a bowl. Unlike when I make hummus, for this dip I like the beans to keep some texture and lumps, but you can also make this very smooth and creamy. If you want it to be smooth and creamy, continue the rest of this with the processor. Otherwise, put the mixture so far in a bowl, add 2-3 tablespoons of pesto and mix by hand. Add a little at a time and taste to get it to desired intensity. Add additional pesto oil, salt or lemon juice as desired. Garnish with drops of basil oil, basil leaves or flowers.
Notes: Serve with crackers, pita bread or raw veggies such as celery and carrots. You can skip a step and purchase your favorite pesto sauce instead of making your own pesto oil.
Wine Suggestions: Yummy with light, crisp whites and aromatic whites such as Grüner Veltliner, Sancerre, Albarino, Verdejo, Chablis or other lightly oaked White Burgundy. Although I’ve heard that Cabernet Sauvignon is a good pairing with Pesto, and I can see how that could be the case, I think the whites are much better matches flavor and weight-wise for this fairly light dip.
Easy Tiramisu

Time: Approximately 40 minutes from start to finish, and it should rest in the refrigerator at least a few hours before serving. It can also be made up to several days before serving. But good luck not getting into it if you try that!
Serves: 20-30
Inspired by: When I lived in Hong Kong, I discovered that it is a mecca for fabulous food of most ethnicities. After an incredible Italian meal and the best Tiramisu I’d ever had in my first month there, I found myself on a quest to find the perfect Tiramisu. It was fun seeing how many different styles and flavors there were! I must have had more than 20 different versions during my year there. After a few more yummy Tiramisu desserts in Italy over the past few years and surprisingly, my favorite little town in Mexico, Sayulita, I decided it was time to learn to make it. I hosted an Italian wine tasting recently and finally gave it a try. Yum! This recipe is a mix of various versions I found on the web. This one does not use any raw eggs.
Supplies:
- 9-inch-by-13-inch-by 2 inch dish or 15-inch-by-10-inch-by 2 inch dish (for Tiramisu)
- 5 x 9 x 2 in dish (optional – for a second Tiramisu if you have remaining ingredients)
- Small flat dish for dunking ladyfingers in coffee/liquor mixture
- Mixing bowl
- Mixer
- Very fine cheese grater (for the chocolate topping)
Ingredients:
- 16 oz mascarpone cheese
- 3 cups heavy cream (1.5 pints)
- 2 tablespoon confectioners’ sugar
- 1 ½ Cointreau (or dark rum or the liquor of your choice)
- 1 ½ cups espresso or strong French pressed coffee
- 1 tablespoon vanilla extract
- 60 lady fingers cookies
- 4 oz dark chocolate (sweet, not the kind for baking) for grating over the top
Preparation:
- Make espresso or strong coffee.
- Mix espresso with the liquor in equal parts. It is easiest if you put this into a small flat dish so it’s easy to dip one side of the lady fingers cookies quickly and evenly, but any bowl can work.
- In a large mixing bowl combine mascarpone cheese, heavy cream, confectioners’ sugar, 4 tablespoons of the coffee/liquor mixture, and 1 tablespoon vanilla.
- Beat until creamy and smooth and can hold a shape (but not so thick where it becomes butter) – approximately 3-4 minutes.
- Quickly dip one flat side of lady fingers in the coffee/liquor mixture and layer them on the bottom of your pan (approximately 20-23 cookies for the 9-inch-by-13-inch dish) – they do not all have to lay the same direction or look pretty – just fully cover the bottom of the pan.
- IMPOTANT NOTE: if you like your tiramisu stronger (more coffee/liquor flavors) – dip both sides of cookies wet with your coffee/liquor mixture, but I prefer just dipping one side in quickly. I just made this tonight in celebration of my good friend Jeanette – I thought it would be a fun alternative to a birthday cake after our Italian-themed dinner. I thought it turned out too strong – much more so than the last time I made it – and I’m sure it’s because I dunked the cookies rather than dipped one side quickly. Next time I’ll be sure the cookies stay crispy and just one side is dipped in very quickly.
- Spoon the cream mixture over the lady fingers and spread as if you were icing a cake – about ¼ inch thick (don’t use more than half of your mixture, but you’ll more likely use about a quarter or a third of it).
- Then dip and layer the rest of the ladyfingers on top of the cream.
- Top off with additional cream mixture and fully cover the top so it is smooth – again, about ¼ inch thick.
- At this point, depending on what size pan you started with and how thick you layered the cream, you should have just enough ingredients left to make one more small Tiramisu in a 5.5 x 9 x 2 inch glass baking dish.
- With a very fine grater, grate the chocolate over the top.
- Let rest in refrigerator for a few hours before cutting – lasts for about one week in the refrigerator.
Wine Suggestions: I’m not a huge fan of wine with Tiramisu. I prefer it with an espresso (and in my case a decaf espresso or I’d be doing gymnastics all night!).
