Baklava

Time: approximately 2.5-3 hours from start to finish
- 15-30 minutes to melt and clarify butter, chop nuts and make syrup
- 60-75 minutes to assemble and cut
- 60 min to bake and cool
- 15 min to put into pastry cups
Serves: yields 30-50 pieces – depending on how you cut them
Inspired by: my Armenian grandmother. I grew up with “Paklava” as she pronounced it. I’ve since adopted “Baklava” since that is how I hear the rest of the world pronounce it. It was always one of my favorite desserts around the holidays. Although I never learned to make it from her, my mother did so I was able to learn from her. I have since modified the recipe a bit. I prefer pistachios instead of walnuts. There also used to be a cup of hot Crisco poured all over it halfway through cooking, but after trying the recipe with and without, I can’t figure out what it was meant to do so I removed it. I’ve seen some recipes that combine the clarified butter and the Crisco. Perhaps it is supposed to hold it together better, or perhaps some marketing person at Crisco years ago told all of these Armenian and Greek women that it was a key ingredient that they needed to start using!
Supplies:
- Damp dish towel and plastic wrap (to keep the dough from drying out while working with it)
- Pastry brush
- Baking pan, approximately 13” x 9” x 2”
- Small sauce pan
Main Ingredients:
- 2 cups (4 sticks) unsalted butter
- 1 box frozen phyllo dough (thawed according to package instructions)
- 3 cups finely chopped unsalted pistachios – raw or dry roasted (my grandmother used walnuts, and my mother has added cinnamon to the walnuts which is awesome, but pistachios are now my favorite)
- ¼ cup sugar
Syrup Ingredients:
- 1 cup water
- 1 ½ cups sugar
- ¼ of a lemon
Preparation:
CLARIFY BUTTER: Melt butter over low heat or in microwave. Let sit for 10 minutes and then skim creamy foam off the top and discard. If you also find creamy residue at the bottom, try not to use that part, just dip the pastry brush into the clear butter at the top. Clarified butter won’t spoil – this way the baklava won’t go bad sitting at room temperature for a couple of weeks. (If you run out of butter while assembling, cover everything and make some more or start with an extra stick – you can never use too much butter on baklava!)
PREPARE NUTS: Chop the nuts very fine in a food processor and add a little sugar for flavor depending upon how sweet you like them. If you are using walnuts, consider adding in a bit of cinnamon like my mom does – yum!
MAKE SYRUP: While you are waiting for the butter cream to rise, make the syrup. In a small sauce pan, mix the sugar and water and the ¼ of a lemon and simmer for about 10 minutes. By the time you are done the butter will be ready to be clarified.
PREPARE DOUGH: After you have clarified your butter, open out the dough and cut in half. Ideally your sheets of dough will be approximately the size of the baking dish. If they are smaller, then alternate where you layer them so the dough is fairly even when you are finished. If the sheets are larger than the pan, after every 10-15 sheets of layering, you can cut the excess away around the edges with a knife. To keep the dough from drying out while you are working with it, you can cover it with plastic wrap and lay a damp towel over the plastic.
LAYER DOUGH WITH BUTTER AND NUTS: Before you begin, preheat your oven to 350 degrees. Dip your pastry brush in the clarified butter and butter the bottom and sides of your pan. Lay the first piece of dough in the pan and brush it with butter, then the next, and do this until you’ve used a little more than half the dough. Be generous with the butter – brush over all the dough, but not so heavy that you’d have excess butter standing in the pan.
Then layer on the chopped nuts with sugar (if you feel the layer is too thick with nuts, you don’t need to use them all). Then start again with layering the dough again on top of the nuts, brushing with butter in between. But don’t butter the very top layer of dough or it will burn when baking!
Alternatively, you can layer one third of the dough, half the nuts, another one third of the dough, the other half of the nuts, and then the last one third of the dough. I’m finding that after it’s finished, it may hold together better this way. Some even separate this into five layers of nuts with dough in between.
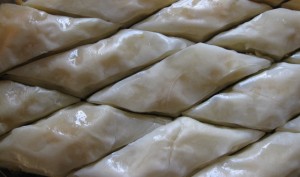
CUT INTO DIAMONDS: You can cut these into squares also – but diamonds look pretty and from what I’ve been told, it is one of the most traditional for Armenian “Paklava”. To cut diamonds, start first by cutting lengthwise down the baking dish, about 1 inch a part or a bit less – probably about 7-8 rows. Then, cut across those cuts on a diagonal – again 1 inch or less apart. Start by cutting a small corner on a diagonal and then just keep going until you get to the other corner. Cut thicker strips for big pieces. I prefer the smaller pieces because they are so rich and because it makes it easier for one pan to serve a large group of people.

BAKE: Bake at 350 degrees for 25-30 minutes. It will turn a light golden brown. Watch it carefully in last 5 minutes or so to ensure it doesn’t get too dark.
When Baklava is still slightly warm, and syrup is lukewarm and thickened, pour syrup to cover and soak down into the grooves. I have found that you might want to use about half the syrup while drizzling it very slowly – wait a little bit before drizzling on the rest to ensure it gets into the top layers as much as the bottom. You might not need to use all the syrup. There shouldn’t be a lot of syrup just sitting in the bottom of the pan, but a little is okay.
SERVE: Serve in pastry cups or cupcake papers. It will keep well for a couple of weeks. In a very dry climate, it helps to lay a loose piece of plastic over the top, but in a moist climate, wait until they are thoroughly cooled and cover loosely with wax paper to let air or they will get soggy.
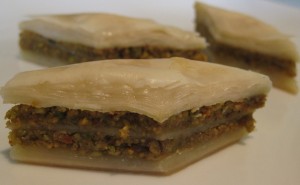
Notes: I have found that when the layer of nuts is too thick the baklava falls apart more easily in the middle where the nuts are. I’ve only recently started layering the dough so that there are two or more thin layers of nuts and it does seem to hold together a bit better. I think in this photo the dough was split into thirds. The top layer will always look puffier.
Wine Recommendations: This is a sweet dessert! I’d recommend skipping the wine, but if you are trying to find a dessert wine to enjoy this with, try to find a white that is sweeter than the dessert – I love most anything with botrytis.


